Thursday, March 21, 2013

Layered Cake Bars


 These suckers were so easy to make and quite delicious! Sweetened condensed milk mixed together with cream cheese for the top layer, what could be better than that!? The next layer is white chocolate chips and dark chocolate chips...oh my gosh, good right! Finally, the bottom layer is what makes this such an easy dessert, it's just your favorite box of chocolate cake mix! Enjoy these super easy desserts :) I found this awesome recipe on Pinterest from Averie Cooks


Ingredients:

1 box devil’s food cake chocolate cake mix (or your favorite boxed chocolate cake mix)
1/2 cup butter (1 stick), softened
1 large egg
1 teaspoon vanilla extract 
1 to 2 tablespoons cold brewed coffee or water, optional if necessary
3/4 cup semi-sweet chocolate chips
3/4 cup white chocolate chips
1 can (14-ounces) sweetened condensed milk
1/2 cup (4 ounces) cream cheese, softened 
1/2 teaspoon vanilla extract (clear imitation vanilla extract will keep this layer whiter)
Directions:
Preheat oven to 350F and prepare a 9-by-13 inch pan by lining it with aluminum foil and then spraying it with cooking spray. In a large mixing bowl, combine the cake mix, butter, egg, vanilla and mix either with a mixer, with a spoon, or with your hands, kneading it together. The batter will be extremely thick and will be difficult to combine, but keep stirring or use your fingers and knead it together, adding the coffee (will deepen the flavor and does not make them taste like coffee) or water if necessary. Press the dough it into the prepared pan. It will be tacky, sticky, and a bit tricky to work with, but keep pressing, spreading, and finessing it. Sprinkle the white and dark chocolate chips evenly over the top.
In a mixing bowl, combine the sweetened condensed milk and cream cheese, stir until well combined, and pour mixture evenly over dough, using a spatula to gently spread and even it if necessary. Bake for 24 to 27 minutes, or until edges of bars begin to barely brown and pull away slightly from the sides of the pan, or until the middle has barely set, taking care not to overbake. When they are done cooking, carefully lift them out of the pan and let set. Note that the middle will not seem very well set and will be jiggly upon removing from oven and that is okay, you want to keep these gooey. They will continue to set up more after they have cooled. Allow bars to cool well before slicing and serving. Store in an airtight container in the refrigerator for up to a week or freeze for up to three months.



Tuesday, March 19, 2013

White Chocolate Snickerdoodle Blondies

These blondies were so delicious! They were soft, chewy and the pieces of white chocolate are sweet surprises. I loved these so much and so did everyone in the family! The white chocolate is a must in snickerdoodles bars! I took these goodies to a party and they were a huge hit, everyone loved them! The beauty of these blondies, is it's so simple to make, anyone can do it!

Ingredients:
1/2 cup butter, softened
1 cup sugar
1/4 teaspoon salt
1 large egg
1 1/2 teaspoons vanilla extract
1 cup four
1/2 cup white chocolate chips + 1/8 cup
1 Tablespoon sugar & 1 teaspoon ground cinnamon, mix together

Directions:
In a large bowl, cream butter and sugar until fluffy and light. Beat in salt, egg and vanilla until combined. Stir in flour until combined, and then stir in white chocolate chips (1/2 cup). Batter will be thick.
Spread and press evenly into pan. Sprinkle the 1/8 cup of white chocolate chips on top and sprinkle the cinnamon sugar mixture over the top. Bake for 30 minutes, or until edges are lightly browned. Let cool completely before cutting.

I adapted this recipe from somewhere on Pinterest, but I have no idea what blog!

Saturday, March 16, 2013

Homemade Ice Cream Sandwiches with Homemade Ice Cream


This weekend we are celebrating my little sisters big 14th birthday! For this wonderful celebration, my amazing mom decided to make 100% homemade ice cream sandwiches for my sisters friends at school! Yes, the whole shabang...homemade ice cream and homemade cookies! The homemade cookies and ice cream truly make this the BEST ice cream sandwich ever! All her friends and everyone in the family absolutely loved them. The ice cream was so rich, creamy and smooth. Seriously the best ice cream you will ever have! In fact, we liked it wayyyy better than store bought! The cookie was perfect for this ice cream too. We found these two amazing recipes on the Brown Eyed Baker blog and FYI you don't have to make them in hearts or put the pink stuff on them, we just did that for her party :)

This recipe is from the Brown Eyed Baker! :)
For the Cookies:
½ cup vegetable shortening
1¼ cups light brown sugar
½ teaspoon baking powder
¾ teaspoon salt
½ cup Dutch-process cocoa powder
½ teaspoon instant espresso powder
½ teaspoon vanilla extract
2 cups all-purpose flour, divided

DIRECTIONS:

1. Line a 9x13-inch baking dish with foil, allowing excess to hang over the edges.
2. If you're using homemade ice cream, immediately after churning, spread the ice cream into the prepared pan. If using store-bought ice cream, soften it slightly and then spread it into the prepared pan. Freeze overnight.
3. Preheat oven to 350 degrees F.
4. In a large mixing bowl, beat together the shortening and the brown sugar with an electric mixer for 2 to 3 minutes. Add the baking powder, salt, cocoa powder, espresso powder and vanilla. Mix until incorporated. Mix in 1 cup of the flour, followed by 2 tablespoons of water, and then add the remaining 1 cup flour and another 2 tablespoons of water, mixing well until no dry ingredients remain (give it some time, up to 5 minutes of mixing). The dough should be soft and pliable but not sticky; if necessary, add more water, a teaspoon at a time, until the dough comes together.
5. Turn out half the dough onto a lightly floured surface and roll to an even 1/8-inch to ¼-inch thickness. Cut the dough into 2x4-inch rectangles (you could also cut into squares, or use a cookie cutter to make circles).
6. Transfer the cookies to a baking sheet lined with parchment paper. Using a skewer (or the tip of a thermometer - works awesome!), poke a pattern of holes on each cookie's surface. Roll out, cut, and poke remaining dough, rerolling the scraps as you work. Place the sheets of cookies in the freezer for 10 minutes before baking.
7. Bake 7 to 8 minutes, or until the cookies are just set. Do not overbake.
8. Remove from the oven and let the cookies cool 2 to 3 minutes on a baking sheet. Transfer to cooling racks and cool to room temperature. Freeze cookies for at least 1 hour before assembling the sandwiches.
9. To assemble the sandwiches, have everything ready and work quickly! Match up cookies of the same size and have them laid out and ready for the ice cream. Use the edges of the foil to lift the block of firm ice cream from the baking pan and place it on a cutting board. Working quickly, cut the ice cream into 2x4-inch rectangles (you'll have a little ice cream left over). Using a narrow stainless steel spatula, place a rectangle between two chilled cookies and press the cookies lightly to adhere. (I found it easiest to do this one at a time. Cut one or two rectangles, assemble those cookies and place on a tray, then do one or two more, etc. until you're finished.) Return the sandwiches to the freezer for at least 30 minutes. Wrap individually in plastic wrap and store in an airtight container or zip-top plastic bag in the freezer.
**NOTES**
We made our cookies using a heart cookie cutter, but you can do yours in squares like she says in the directions! We also made homemade cookies and cream ice cream from her blog, but you can use store bought if you want. Also, the next time we make them, we are going to make the cookies thinner, because it got kind of thick. It was still so good though...just a thought :) 
For the Ice Cream, here is the amazing recipe from her blog! Cookies and Cream Ice Cream

Mom's Coffee Cake

My mom has been making this amazing breakfast my entire life. It's truly the best coffee cake I have ever had! It's so moist and flavorful and it's one of the best things to wake up too. The aroma that fills the house is just incredible. This coffee cake is a huge downfall for my mom and I, we nibble on it all throughout the day..it gets bad. It's Ellie's birthday, so she requested this for her breakfast. It's always a popular request for a birthday breakfast in the family :)

Ingredients:
Layer and Topping
Combine ingredients and set aside
1 cup brown sugar
4 tablespoons flour
4 teaspoons cinnamon
4 tablespoons butter, melted

Wet mixture. In another bowl, work sugar and shortening together with a fork & add the eggs and milk to the mixture and set aside:
1 1/2 cups sugar
1/2 cup vegetable shortening
2 eggs
1 cup milk

Dry Ingedients
Sift together:
3 cups flour
4 teaspoons baking powder
1 teaspoon salt

Have a 9x13 pan greased and ready. Combine dry and wet ingredients together and QUICKLY pour 1/2 the batter into the prepared pan. Evenly spread 1/2 of the layer mixture over batter. Pour the remaining batter on top of the layer, then quickly spread the remaining layer/topping mixture on top.
 ** The batter can be difficult to work with, so make sure and have more batter for the 2nd layer because it's easier to cover the sugar mixture with more batter.**

Bake at 375* for 25-30 minutes.
Must server with real butter melted on top!
This heats up great the next day!
Can't forget the milk! 

Wednesday, March 13, 2013

Turtle Brownie Bars

The title does not do these brownies justice. There are no words to describe how amazingly good they are! My taste buds have never had something as good as this! The brownie is so moist and the caramel and walnuts on top are A-M-A-Z-I-N-G! This brownie is so rich and sinfully good! It's safe to say this is my new favorite brownie! You will without a doubt love this recipe! Pinterest for the win!

Turtle Brownies

Ingredients
For the brownie:
3/4 cup all-purpose flour, plus an additional 2 tablespoons
1/4 teaspoon baking powder
1/2 teaspoon salt
4 ounces semisweet chocolate chips
1 ounce (1 square) unsweetened chocolate, broken into pieces
1/2 cup (1 stick) unsalted butter
1 cup packed light brown sugar
1 teaspoon vanilla
2 large eggs
For the caramel topping:
3/4 cup granulated sugar
1/3 cup light corn syrup
3 tablespoons water
Pinch of salt
1/3 cup heavy whipping cream
1 teaspoon vanilla
1 and 1/2 cups walnuts, lightly toasted and coarsely chopped
For the garnish:
1/2 cup semisweet chocolate chips
Instructions
1. For the brownies: Preheat the oven to 350 degrees.
2. Prepare a 8×8-inch square pan by buttering it and lightly flouring the surfaces.
3. In a large, heavy saucepan over medium heat, melt the chocolate chips, unsweetened chocolate, and butter.
4. Stir the mixture until smooth, and then remove from the heat.
5.  While the chocolate mixture cools, combine the flour, baking powder, and salt in a separate bowl.
6. Add the brown sugar and vanilla to the chocolate mixture, mixing well.
7. Add the eggs, one at a time, mixing well after each addition.  ***The batter should look thick and smooth.
8. Add the flour mixture to the chocolate, and mix until just combined.
9. Pour the batter evenly into the prepared baking pan and bake until a cake tester inserted into the center comes out clean, about 30-35 minutes.  Let cool.
10. For the caramel topping: I waited until the brownies had about 10 minutes left, then started the caramel.  In a heavy saucepan over medium-high heat, combine the sugar, corn syrup, water, and a pinch of salt and stir until the sugar is dissolved.

11. Bring the mixture to a boil and let boil without stirring until the color turns a light amber, about 8 minutes or so. **Keep a close eye on it & don’t let it get too dark**
12. Remove the saucepan from the heat, and add the cream and vanilla, stirring until thick and smooth. **Be careful, it will bubble and splatter.
13. Pour the caramel evenly over the brownies.
14. Sprinkle the toasted walnuts on top of the caramel, and let the brownies cool completely. (To toast the walnuts, put them in the oven on broil for about 3 minutes). **I stuck mine in the fridge for about 20 minutes.
15. For the garnish: In a small bowl, microwave the chocolate chips at 10-second increments, stirring after each interval, until smooth.
16. Cut a very small piece off a corner of a plastic sandwich baggie, and spoon the chocolate into the bag. **Or use a pastry piping tip.
17. Use the open end to quickly drizzle the melted chocolate over the top of the brownies. Let cool.
Yummy oozing caramel! 
I slightly adapted this amazing recipe from The Curvy Carrot.

Friday, March 8, 2013

Cinnamon Swirl Banana Bread


New Pinterest Recipe of the Week
In the Abbott house, when we have something that needs to be used, we like experiment with a new recipe. Well today, bananas were on their last leg and thanks to handy Pinterest, I found this yummy Cinnamon Swirl Bread on a blog called Lovin' From the Oven. This bread turned out great and we actually had it for breakfast :) It's super moist and the cinnamon and sugar is SO good on top! You can even add nuts or chocolate chips! We will make this in the future for sure.

Ingredients
    For the bread:
  • 3 over-ripe bananas, smashed up
  • 1/3 cup melted butter
  • 3/4 cup sugar
  • 1 egg, beaten
  • 1 tsp vanilla
  • 1 tsp baking soda
  • dash of salt
  • 1 1/2 cups flour
  • For the swirl:
  • 1/3 cup sugar
  • 1 Tbs cinnamon
Directions
  1. Preheat oven to 350. Butter and four a loaf pan. Mine was 9 x 5, but you could use any sort, I suppose. Just keep a close eye on it in the oven, and adjust the time as needed
  2. Mix bananas, butter, sugar, egg, and vanilla together. sprinkle baking soda and salt around on top of the banana mixture. Then gently stir in flour. Be careful not to over-mix!
  3. In a small dish, mix together the 1/3 cup sugar and 1 Tbs cinnamon.
  4. Add 1/2 of the batter to the loaf pan and then sprinkle half, or a little more than half of the cinnamon-sugar mixture all over the batter in the pan. Add the rest of the batter, and then sprinkle the leftover cinnamon-sugar on top.
  5. Bake for 50-60 minutes, but remember, if you’re using a different-sized loaf pan, be careful and keep a close eyeball on it.
*Recipe copied from here!

Wednesday, March 6, 2013

Honey Nut Granola


Don't spend money on granola,the price is outrageous! So here is a recipe that taste better than store bought and way cheaper. I don't know why I've never made it before, but I did today and it turned out great! The thing I love about granola is you can add just about anything to it...walnuts, pecans, peanuts, crasins, almonds, rasins...anything. So here is a really simple recipe that only takes about an hour to make. Everyone in my family loved it and is so good on yogurt and it makes a great cereal. 

Ingredients:
3 cups quick cooking oats (I used old fashion & it worked fine)
½ cup chopped peanuts (or nuts of choice)
¼ cup wheat germ  or (I used flax seed)
1/3 cup honey + a little more when mixing
1/3 cup brown sugar (a little less than 1/3 cup)
¼ cup vegetable oil
2 tablespoon warm water
½ teaspoon salt
1 teaspoon vanilla
1/8 cup crasins or rasins (optional) 

Directions:
 1. Preheat oven to 250 degrees F (120 degrees C). Lightly grease a baking sheet. 
2.  In a large bowl, combine oats, peanuts, and wheat germ (or flax).  In a separate bowl, combine honey, brown sugar, vegetable oil, water, salt, and vanilla. Stir well; then pour into the oat mixture, and stir. Spread out on a cookie sheet (it is really helpful to line it with parchment paper). Bake for 1 hour, stirring every 15 minutes. Remove from oven, and cool before serving.

**I cooked mine for about 1 hour and 20 minutes, but I think it's because I used old fashion oats** I was worried because it wasn't getting hard in the oven, but it hardens after you take it out of the oven and let it set. So don't worry if its still moist...it will harden up! 

More granola combinations to come! This recipe was adapted from All Recipes


Friday, March 1, 2013

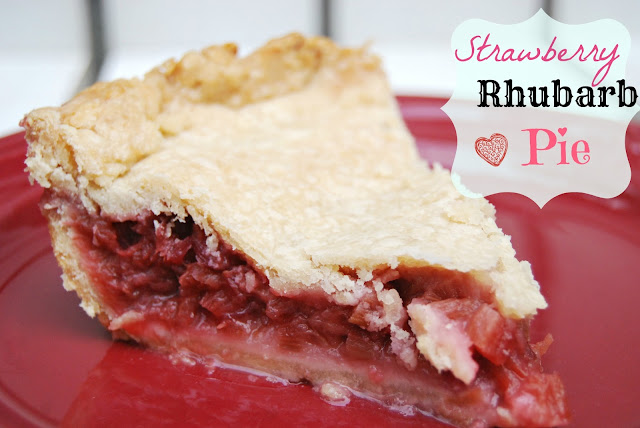
Best Ever Strawberry Rhubarb Pie


We are a pie family. We absolutely love pies. At any family gatherings we have at least 10-15 different types and we all use the same pie crust, just with different fillings. Well today I am so excited to share one of my most favorite pies ever...Strawberry Rhubarb. Luckily, my mom freezes rhubarb so we can have it throughout the year and today we broke some out (yikes, not that much left)! Of course this mouthwatering pie comes from my grandmas cookbook. Grandmas always do know best :) 
Before you make this...I'm warning you...all self control WILL be lost. It is quite possible you will have it for breakfast, lunch and dinner...I do! 

Pie Crust:
4 cups flour
1 3/4 cups vegetable shortening (Crisco)
1 tablespoons sugar
2 teaspoons salt
1 egg
1 tablespoon vinegar
Ice water

Sift dry ingredients. Cut in crisco(using fork)- very slowly. Then combine in clear a pyrex 2 cup measuring cup: 1 egg- beaten plus 1 tablespoon vinegar. Fill with ice cold water till it reaches 1/2 cup in liquid. Then mix this into the flour and crisco, again, very slowly, stirring with a fork.
This dough is hard to work with, so roll out immediately. I pat it out a bit, then roll it out on a floured piece of wax paper. (This makes it easy to transfer, or cover with another piece of wax paper, and freeze in a zip lock bag.)
This recipe makes 2 pies, or 4 single pie crusts. Freeze the dough that is not used.

Same pie crust used in my Lemon Meringue Pie

Now for the oh so good filling: 
4 cups chopped rhubarb, peel out the tough strings
2/3 cup sugar
2-3 drops of red food coloring
If you do not have enough rhubarb, add enough strawberries to make a full 4 cups! Even if you do have enough, you can still add 5-7 sliced strawberries for added flavor.
If you do not want strawberries, you don't have to add any! Just make a Rhubarb Pie :)

Directions:
Mix together the ingredients for the filling and place in the prepared pie crust. Put the crust on top and join the edges together. Cut three notches on top for air to escape. Bake at 350* for 45 minutes and enjoy!


Wondering why this picture isn't as nice as the one above? The answer is...lack of self control. When my favorite pie comes out of the oven, I do not have the patience to let it set up and get all pretty. I have to have it then and there!

Sunday, February 24, 2013

Divine S'more Bars


Holy S'mores these are amazing! These bars are absolutely die for. I could hardly keep myself from eating the whole pan...yes, they are that good. It totally reminds me of camping. Everyone MUST try these!
Ingredients
1/2 cup butter, room temperature
1/4 cup brown sugar
1/2 cup sugar
1 large egg
1 tsp vanilla extract
1 1/3 cups all purpose flour
3/4 cup graham cracker crumbs
1 tsp baking powder
1/4 tsp salt
2 king-sized milk chocolate bars (e.g. Hershey’s) or 4 regular sized bars
1 1/2 cups marshmallow creme/fluff (not melted marshmallows)
Directions
Preheat oven to 350°F. Grease an 8-inch square baking pan. In a large bowl, cream together butter and sugar until light. Beat in egg and vanilla. In a small bowl, whisk together flour, graham cracker crumbs, baking powder and salt. Add to butter mixture and mix at a low speed until combined .Divide dough in half and press half of dough into an even layer on the bottom of the prepared pan. Place chocolate bars over dough. 2 king-sized Hershey’s bars should fit perfectly side by side, but break the chocolate (if necessary) to get it to fit in a single layer no more than 1/4 inch thick. Spread the marshmallow layer across the chocolate. This part can get fairly messy J Place remaining dough in a single layer on top of the fluff (most easily achieved by flattening the dough into small shingles and laying them together).
Bake for 30 to 35 minutes, until lightly browned. Cool completely before cutting into bars.
Found this recipe from Here

Saturday, February 23, 2013

Lemon Meringue Pie

We had a lot of extra lemons in the house, so my mom decided to make a Lemon Meringue Pie! It's such a refreshing pie and a nice change from the traditional berry pie. I really enjoy the different texture of it! Not to mention, it's really beautiful!
The crust! This crust is from my great grandma and it is truly one of a kind. I have NEVER had a pie crust that is as good as this one. We use this pie crust for every type of pie. It is definitely a family recipe that has and will be in our family for ever!

Pie Crust:
4 cups flour
1 3/4 cups vegetable shortening (Crisco)
1 tablespoons sugar
2 teaspoons salt
1 egg
1 tablespoon vinegar
Ice water

Sift dry ingredients. Cut in crisco(using fork)- very slowly. Then combine in clear a pyrex 2 cup measuring cup: 1 egg- beaten plus 1 tablespoon vinegar. Fill with ice cold water till it reaches 1/2 cup in liquid. Then mix this into the flour and crisco, again, very slowly, stirring with a fork.
This dough is hard to work with, so roll out immediately. I pat it out a bit, then roll it out on a floured piece of wax paper. (This makes it easy to transfer, or cover with another piece of wax paper, and freeze in a zip lock bag.)
This recipe makes 2 pies, or 4 single pie crusts. Freeze the dough that is not used.

For this recipe, bake just 1 crust at 350* for about 15 minutes. Makes sure and fork the pie crust so air can escape the bottom of the dough.
_________________________________________________________________________________


The Pie
Place in saucepan on low heat:
6 tablespoons cornstarch
1/4 teaspoon salt
1/3 cup sugar
2 cups water
3 egg yolks
1/3 cup sugar
2 tablespoons butter
5 tablespoons lemon juice

Meringue:
1/4 teaspoon cream of tartar
3 egg whites
1/3 cup sugar

Directions:
Mix, and put first 4 ingredients in a saucepan. Start to cook, stir constantly on low heat. After this mixture cooks for about 3-4 minutes. Add: 3 egg yolks mixed with 1/3 cup sugar. Keep stirring and keep on medium to low heat. When it reaches a boil, let it boil for 1 minute. Remove from heat and add 2 tablespoons butter, and 5-6 tablespoon lemon juice. Beat and let cool. Pour into already cooked pie shell.

Beat cream of tartar, egg whites, and sugar (1/4 cup to 1/3 cup). Beat till stiff. Pour over lemon pie-outside edges touching crust first. Put in 350* oven and brown for approx. 10-15 minutes. Keep refrigerated.

Friday, February 22, 2013

Chicken Taco Casserole


Tonight was a "Pinterest" meal night. One night a week my mom tries out a new recipe and this one is a keeper! This casserole is so yummy and easy! Everyone in the family loved it and the best part is...leftovers for tomorrow! We found this recipe on Pinterest and its from Six Sisters. This recipe is great for a family.

Ingredients:
1 (10 oz) bag tortilla chips
2 (10.75 oz) cans cream of chicken soup
1 1/2 cups sour cream
1 (14 oz) can diced tomatoes and green chilis (Ro-tel)
1 can black beans, rinsed and drained
1 (1 oz) packet taco seasoning
3 cups chicken, cooked and shredded
2 cups cheddar cheese

Directions:
Preheat oven to 350* degrees. Lightly grease 9x13-inch pan. In a large bowl, combine the chicken soup, sour cream, Ro-tel, black beans, taco seasoning and chicken. Set aside.
Crush chips with hands (don't crush too small though) and spread half of them on the bottom of the pan. Spread half of the chicken mixture over the tortillas. Top with 1 cup of cheese. Repeat layers. Bake for 30 minutes, until bubbly and cheese is starting to brown.

I topped my casserole with salsa, green sauce and tapatio.
**When we made this, we made homemade chips instead. So good!**

Artisan Free-Form Loaf

This is seriously the BEST bread ever! It makes 4 loaves and you can store the dough in the fridge for up to 14 days until you need it. The way it's cooked makes a chewy outside and a soft inside. It is amazing! The bread hardly last a minute in the house, it is gone before the rest of the meal is even ready. It's really good with any kind of pasta dish.
We got this recipe off a site, so Here is the recipe! You won't be disappointed!

Thursday, February 21, 2013

Buttermilk Chocolate Bread

This is seriously the best chocolate bread ever. I feel like anything that has buttermilk in it is just amazing! The buttermilk makes it so moist and delicious. You know the amazing chocolate muffins that Costco makes? Well this taste exactly like them! Put some butter on it while its warm and this bread will knock your socks off, one of my favorite breads of all time!


 Ingredients:
1/2 cup butter
1 cup white sugar
2 eggs
1 cup buttermilk
1 3/4 cups all-purpose flour
1/2 cup unsweetened cocoa powder
1/2 teaspoon baking powder
1/2 teaspoon baking soda
1 cup chocolate chips

Directions:
Preheat the oven to 350*. Grease the bottom of a 9x5 inch loaf pan.
In a large bowl, cream together the butter and sugar until light and fluffy. Beat in the eggs one at a time, then stir in the buttermilk  Combine the flour, 1/2 cup cocoa, baking powder, baking soda and salt: stir into the buttermilk mixture until moistened. Mix in 1 cup of chocolate chips. Pour into prepared pan.
Bake for 55 to 65 minutes in the preheated oven, until a wooden pick inserted near the center comes out clean. Cool in the pan for 15 minutes before removing t a wire rack to cool completely.

Monday, February 18, 2013

Pumpkin Spice Pancakes

This is one of my favorite meals in the entire world! My mom and I discovered these pancakes in the fall of last year and we are hooked on these! It is probably one of the best pancakes I have ever had in my life! The flavor is out of this world, it's downright amazing! Homemade Buttermilk Caramel Syrup, homemade whip cream and walnuts on top...nothing is better than that! We've made these pancakes for countless people and they all LOVE them! They are such a treat in the morning. Warning!!! You will crave these ALL the time! Also I think it is important that you know...you will not have any manners when you eat these, you may lick the plate. I do! 


Ingredients for pancakes:
2 1/2 cups flour
4 tablespoons sugar
1 1/2 tablespoons baking powder
2 teaspoons cinnamon
1 teaspoon ground ginger
1 teaspoon salt
1/4 teaspoon nutmeg
1/8 teaspoon ground cloves
2 cups milk
3/4 cup canned pumpkin puree
4 tablespoons melted butter
2 eggs

Directions:
Whisk together flour, sugar, baking powder cinnamon, ground ginger, salt, nutmeg, and a pinch of ground cloves. In a separate bowl, stir together milk, pumpkin puree, melted butter, and egg; fold mixture into dry ingredients. Set griddle to 350* and use non-stick spray on a griddle. Pour the desired size of the pancake. Cook pancakes about 2-3 minutes per side. Serve with Buttermilk Caramel Syrup, homemade whip cream, and walnuts on top (instructions listed below). Enjoy!


Caramel Buttermilk Syrup:
1 1/2 cups buttermilk
1 cup sugar
1 cup brown sugar
1/4 cup butter
1 teaspoon baking soda
1 teaspoon vanilla

Directions:
In a large saucepan, bring buttermilk, sugars, and butter to a boil over medium heat. Remove from heat and whisk in soda and vanilla. It will bubble a lot. Use a large enough saucepan to prevent syrup from boiling over. As it cools, the bubbles will go away. Keep the left overs in a dish and store in the refrigerator. After it is stored in the refrigerator, you will have to warm the syrup before serving again. We place the bottle in warm water before serving so it becomes liquid again. Or you could microwave it.


Homemade Whip Cream:
1 cup of heavy whipping cream
3 tablespoons of powdered sugar

Directions:
Make sure whipping cream is cold and place in mixer. Add the sugar. Using the whisk attachment, beat the cream on high until peaks are formed. Takes about 2 minutes. Enjoy!

Saturday, February 16, 2013

Banana & Peanut Butter Sushi

I made this yummy treat for my breakfast this morning. Makes a great snack or lunch and it was super easy and delicious! Kids would love it for a snack too!

Here's what you need:
1 flour tortilla
2 Tablespoons of Peanut Butter
1 medium banana
Cinnamon & Sugar

Place peanut butter all over the tortilla. Place the whole banana on the peanut butter then sprinkle cinnamon and sugar on top! Slice up into bite sizes and place tooth picks on top :) You have just made yummy protein filled sushi!

Friday, February 15, 2013

The Greek Sandwich

Here is another panini sandwich, I just love them! However, this Greek one is my absolute favorite! This is the best sandwich on this earth! Definitely my favorite lunch or dinner to have! There is no other restaurant that makes a panini this good. It's down right amazing and mouth watering! No joke... Must try!


Ingredients:
2 slices of Sourdough Bread
1 1/2 tablespoons Brianas Asiago Caesar Dressing (Must have)
2-3 slices of Ham, Turkey or 2.5 ounces of Chicken (whatever is on hand)
2 Artichoke Hearts sliced
8-9 Pieces of Sun-dried Tomatoes
Spinach
Red Onion
1 tablespoon or more of Feta cheese
Pepperoncinis
1 slice of Pepper-Jack Cheese (if desired)
Italian Seasoning sprinkles

Directions:
Spread dressing evenly on the bread. The next part is simple...add all the ingredients above to the sandwich,  then place it in the panini grill for 2-3 minutes or until cheese is melted. I never really measure out all the ingredients, I just put what looks right to me on the sandwich. These measurements are just guidelines :)


*Notes*
-If you don't have sourdough bread, that's totally fine! You can use french bread, white bread, brown bread, or anything you have on hand. I've just found that sourdough is the best!
-For the meat, I usually do whatever my mom has in the fridge, sometimes it's just ham and sometimes chicken. Any meat is good in this!
-Toppings. You don't have to have all these toppings just to make the sandwich. If you don't have one ingredient, that's totally fine, still make it! You can also add black olives or any topping you think would be good on it :)

Turkey Bacon Ranch Panini

I love Paninis and this is a good one I made for my dad today, he LOVED it! It's loaded with yummy meats and has tons of flavor!

Ingredients:
2 slices of sourdough bread or French Bread
1 1/2 tablespoons ranch
2 slices of ham
2 slices of Turkey
2 Tablespoons Bacon Crumbles
1 slice of Swiss Cheese
Feta Cheese
Italian Seasoning

Directions:
Spread the ranch dressing on the 2 slices of bread. Place all the meat of the bread. Sprinkle as much feta as desired (I like about 1-1 1/2 TBLS) over meat. Then place Swiss cheese over feta and sprinkle Italian seasoning on top. Place in a panini grill for about 2 mins or until bread is golden brown and cheese has melted. Enjoy!

Thursday, February 14, 2013

Marbled Chocolate Bars

Found these on a blog tonight and decided to try 'em out. They are really yummy and I love the hint of almond flavor in them. Super easy to make and I felt like a pro since they turn out so pretty! Here is the recipe.
*When you make them, I would not do a whole teaspoon of almond though, go easy on it!

My mom's famous potato rolls


My mom makes these fantastic rolls for every holiday! They are the perfect rolls with the perfect sweetness! These are so yummy and easy!


Ingredients:
¾ cup butter                                                                       
4 tablespoons sugar                                               
2 teaspoons salt      
1 cup mashed potatoes                                               
2 eggs, well beaten at room temperature
1 ½ cups potato water (saved from boiling potatoes)
1 heaping tablespoon yeast
7 cups flour

Directions:
Important! Save the water you boil the potatoes in!
Cream butter, sugar, and salt in mixer. Blend in mashed potatoes until smooth. Dissolve the yeast in the potato water after water is cooled for 5 minutes. Combine 2 eggs to the dissolved water mixture. Add flour mixture to the liquid and make dough in mixer using a dough hook. Knead till silky, not tough. (Take out dough when it’s not quite done and finish with hand kneading.) Rise in warm place for 1 ½ hours. Punch dough down. Divide into rolls (a little bigger than the size of a golf ball), place in greased 9x13 pan, and let rise for 30 minutes. Bake 375* for 20 minutes. Makes 26 rolls.

Wednesday, February 13, 2013

My alternative to ice cream is Greek Yogurt!

My yummy dessert of the night!
When everyone in my family is having ice cream, I have Greek yogurt! I made my own version of a banana split tonight and it was super good! This makes a great snack or breakfast too!

Ingredients:
1/2 cup plain Greek yogurt
3-4 frozen strawberries (defrost in microwave)
half of a banana
1/8 cup pineapple tidbits
homemade whip cream (if desired)
walnuts sprinkled on top
stevia to sweeten yogurt

I put my yogurt in the freezer for about 2o mins so it got kind of slushy, then I put all my toppings on top!

Saturday, February 9, 2013

Soft Chewy Chocolate Chip Cookies

Chocolate Chip cookies are probably the most famous cookie ever and this is one of the best recipes for it! This cookie is so soft and chewy and downright delicious! Guaranteed to satisfy.

Ingredients:
1 cup butter softened 
3/4 cup packed brown sugar
1/4 cup sugar
1/2 package instant vanilla pudding mix
2 eggs 
1 teaspoon vanilla extract
2 -1/4 cups all-purpose flour
1 teaspoon baking soda
2 cups semisweet chocolate chips 

Directions:
Cream butter, sugars, and pudding in mixing bowl.  Add eggs, beat well after each one is added. Beat in vanilla. Combine flour and baking soda and add to creamed mixture. Stir chocolate chips into mixture. Bake at 350* on a ungreased baking sheet for 8-10 minutes. Bake until lightly brown, not too much though!  Makes 41 cookies and one cookie is 129 calories each. 

Thursday, February 7, 2013

Low Calorie Tropical Smoothie

I have been making this smoothie forever and I just love it! I use to count calories on myfitness pal and was always upset that this smoothie had a lot of calories in it, but I figured out how to make it low calorie and even tastier! First off, I use Almond Milk, which saves a lot of calories, but the trick is not using frozen fruits when you make it. I defrost my fruit in the microwave first...this means less liquid, which means less calories.

Ingredients: 
4-5 Large Strawberries
1/2 cup of peaches (about 4-5 slices from a can)
1/3 cup pineapple tidbits
1 Tablespoon stevia or sweetner of choice
1 cup ice
1/3 cup Almond Milk

Directions:
If you are using frozen fruits, first defrost them in the microwave about 40 seconds or until soft. Place all the ingredients in the blender and blend until it looks like a whirlpool in the blender, if you don't get that whirlpool add more liquid. You can top it with whip cream too! Makes 1 smoothie :)

Wednesday, February 6, 2013

Easy Homemade Hamburger Buns

Homemade Hamburger Buns-Super Easy!

These buns make that fresh burger that much better! These will seriously add so much flavor to your good ol' American Hamburger. My aunt said she makes these all the time, so we decide to add this to our recipe book of amazing breads! It's definitely a keeper. You won't be disappointed in these homemade buns! Enjoy :)
Ingredients:

1 cup milk
1 cup water
2 tablespoons butter
1 tablespoon white sugar
1 1/2 teaspoons salt       
5 1/2 cups all-purpose flour
2 ¼ teaspoons active dry yeast
1 egg yolk
1 tablespoon water

Directions:

1. Combine the milk, 1 cup of water, butter, sugar and salt in a saucepan. Bring to a boil then remove from the heat and let stand until lukewarm. If the mixture is too hot, it will kill the yeast.

In a large bowl, stir together the flour and yeast. Pour in wet ingredients and stir until the dough starts to pull together. If you have a stand mixer, use the dough hook to mix for about 8 minutes. If not, knead the dough on a floured surface for about 10 minutes. Place the dough in a greased bowl, turning to coat. Cover and let stand until doubled in size, about 1 hour.

2. Punch down the dough and divide into 12 portions They should be a little larger than a golf ball. Make tight balls out of the dough by pulling the dough tightly around and pinching it at the bottom. Place on a baking sheet lined with parchment paper or aluminum foil. After the rolls sit for a minute and relax, flatten each ball with the palm of your hand until it is 3 to 4 inches wide. You may want to oil your hand first. Set rolls aside until they double in size, about 20 minutes.

3. Preheat the oven to 400 degrees F (200 degrees C). Mix together the egg yolk and 1 tablespoon of water in a cup or small bowl. Brush onto the tops of the rolls. Position 2 oven racks so they are not too close to the top or bottom of the oven.

4. Bake for 10 minutes in the preheated oven. Remove the rolls from the oven and return them to different shelves so each one spends a little time on the top. Continue to bake for another 5 to 10 minutes, or until nicely browned on the top and bottom.
This recipe is from All Recipes Here

Then use that wonderful bun to make a delicious burger like this!
By the way...We have discovered the secret to making the best burger ever!!!! Instead of doing it on the BBQ,  we pull out the griddle and cook it on there. But here's the secret...place a saucepan lid over the top of the burger while cooking and right before the burger is almost done, put the cheese on the burger and keep the lid on (We also put bacon or ham on before the cheese sometimes and let the cheese melt over the extra meat). The cheese will melt into a ooey-gooey yummy amazingness! Yes that's right ooey & gooey! It's the best ever. 


Pin It button on image hover